Archive for the ‘Uncategorized’ Category
 It is not unusual for people to discover that they have asbestos in their homes, however it is only since this asbestos was installed that scientists have discovered that asbestos can be dangerous to humans. Did you know that even minimal contact with broken asbestos microfibers can increase your chances of catching an asbestos-related illness? There have even been known cases of people developing asbestos-related problems after breathing in fibers which were on their partner’s clothing, and which were disturbed during regular clothes washing sessions. This is just a taster of how dangerous asbestos can be, if you come into contact with it in a dangerous form. Of course, not everyone who is exposed to asbestos will develop an illness in later life, but it is always a good idea to minimize risks by being aware of what can be done to reduce those risks.
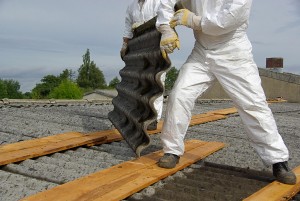
Obviously, if you find out that you have it in your home, you will want to get rid of asbestos as soon as possible and the idea of ripping it out straight away might even come into your thoughts. However, removing the substance yourself could be even worse for your health and the health of your family. Asbestos is only really a threat when it is broken up or damaged, because this is what releases the microfibers into the air and allows them to be inhaled. If the asbestos remains intact, the fibers are not breathable and don’t pose a health risk. If an unqualified person attempts asbestos removal, they can damage the substance and leave themselves in even more danger than before. This is why authorities always recommend that you use a professional asbestos removal expert. In fact, in some locations, it is even illegal to willfully disturb or attempt to remove asbestos without a proper license, so you could end up getting yourself into even more trouble!
Part of the reason why asbestos removal needs to be carried out by an expert is the fact that it can become a danger to everyone else, once it is out of the property. It is not normally just dumped in the city rubbish dump, because it would be so easy to disturb it, if it were left there. Lots of people visit the dump or work at the facility, and if asbestos were left there unmarked, they could easily disturb it, and this would put their health at risk. Therefore it is very important that you seek professional help with asbestos removal.
The best thing about hiring a professional is the fact that they understand how to get asbestos out of your home without putting themselves or anyone else at risk. They realize that the asbestos was originally put there for a purpose, and that it was/is serving a useful job. Knowing this helps them to remove it without compromising the integrity of your home, and without leaving millions of asbestos fibers around. They should also help you to clean up the area, following the removal.
To read about http://orange-restoration.com/services/san-diego-asbestos-removal/
To make an appointment for Invisalign treatment in San Diego, call (619) 382–3884.
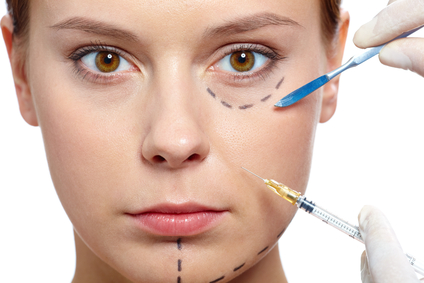
It’s hard to imagine a cosmetic practice that doesn’t offer Botox. It’s like a chicken restaurant not serving thighs or a hamburger place that opposes the use of ground beef. With Botox training, you can get the skills you need to provide today’s most widely requested and most frequently performed cosmetic procedure.
Baby boomers are aging quickly, and there’s a whole generation of younger people behind them who want to stop aging in its tracks before life and neglect line their faces and impact their job chances, love life and self-esteem. Botox is the best tool against aging that facial aesthetics healthcare professionals have available to them, so don’t miss out on the chance to offer it to your clients.
Even More Than Just Botox
In fact, today’s facial aesthetics healthcare professionals use their certified Botox training along with other important skills in a variety of related procedures to make their patients look better than ever. These other complementary cosmetic procedures include:
- brow lifts
- cheek enhancements
- lip and facial sculpting
- jowl treatments
- photofacials
- and more.
And Botox isn’t just for cosmetic uses either. It can be used for facial pain and migraines as well as treatment for TMJ, teeth grinding and more. Ignoring Botox means ignoring a powerful and important tool for aesthetic purposes and overall health improvement.
No Reason To Wait
If you have the slightest inkling that Botox training could benefit you, why wait to get the skills you need? When you take action now, you can be performing Botox procedures quicker and with more acumen that you ever thought possible.
So what’s hold you back? There’s nothing standing between you and the ability to make a huge difference in the lives of lots of good people with your Botox training. Don’t you think it’s time?
reference: http://dentox.com/botox-training/
original transcription: http://biocompatibledentist.org/holistic_dentistry/actual-patient-review-for-dr-vinograd-brighton-dental-san-diego/
Now, the secondary things that happens is if you look at this, here’s some cross-section. Look at it from the top. Tuberosity, palatine fold here midline. So, what happens basically is when you talk about the depth and the shape of the posterior palatal seal, right at the midline and right at the laminar notch, the carpet padding under the mucosa is fairly thin. If you take a ball burnisher and you go push on these areas, if you push here and here and here, it’s not all that squishy. The carpet padding’s fairly thin so when you’re making the depth of your post dam, the butterfly shape, we come not to but through the laminar notch and we give a little blip up here, come back, a little blip, come back around here.
Why are the blips going around here? Two reasons. These are the areas where we’re most likely to get the air leak because, again, of the shrinkage of the denture. When it went up, it pulls away. Those are also the areas where the carpet padding’s the thickets. The accessory salivary glands, the submucosal fatty tissue, those kinds of things are thicker in here and in here. So, sometimes, if the soft palate moves up in the air, it tends to drag up the tissue just a little bit. Can you see that the thicker the tissue is, the squishier the tissue is?
Here’s my hard palate. There’s my soft palate moving up and down, and this fist is the back end of my denture. So, my denture back end of it ends right at my knuckles. So, here’s your hard palate. Here’s your soft palate. Here’s your denture and soft palate. It moves down. When the soft palate moves up, can you see that the thicker the tissue is here, it might pull that tissue up a little bit more and let air leak over the top?
So, the thicker the subcutaneous tissue is in those areas, the more compressibility exists on this very back edge of the hard palate. You’re still on the hard palate, but you’re at the very back end of it, and there’s some thickness to the end, especially some thickness to the subcutaneous connective tissue.So, the thicker it is, if this flexes up a little bit, it’s going to drag that tissue up a little and let air leak over the top. That’s why we make these things a little bit deeper and a little bit broader in these areas.
Now, the other thing that people want to remember is, again, for even some of my colleagues that will do this with fluid, some of my colleagues, if I look at the shape of the maxillary denture, in the old days I’ve seen them do it. So, when they get done with the fluid wax under this thing, they say, “What in the hell is that?” They’ll say, “I’ll get a better seal. I’ll get a better seal.” Basically, if we want this denture to displace this tissue just a little bit, can you see the only thing keeping the denture in place is interfacial surface tension and spit?
There is no wing nut that this thing’s screwed up in there with. So, can you see that there’s a limit to how much soft tissue you can displace? So, if the air’s going to leak, where is it going to leak? It’s only going to leak to this very, very back edge. So, these post dams don’t need to be that wide in an anterior and posterior direction because you displace that much tissue up because all you’ve got holding the denture in is spit and interfacial surface tension.
So, by trying to cover up a much broader area with your post dam, you get the net effect of what I call this then acts as cross country shoes or snow skis. So, you don’t compress the tissue at all because you can’t compress the tissue that much. So, what happens basically is it touches up here by the incisive papilla. It touches back here and is in contact with a lot of these areas. You wind up with not that great a retention. So, making post dams extremely wide in the A-P direction is not necessarily a great idea, and making them really deep isn’t a real great idea because I’ll take my bur and I’ll just cut this sucker here really deep. We’ve got a groove in here. It’s just kicking butt.
What do you supposed you’re going to see when the patient comes back for their first? Maybe when you deliver it, it’s got good retention. What do you suppose you’ll see when they come back for their first post-insertion adjustment? Their tissue is redder than this marker is right there. It’s bleeding. It’s ulcerated. It just hurts like hell, and for you just to make them comfortable, you can’t just go zzz, zzz. No, no. You’ve got to hog and grind and hog and grind until finally they can tolerate having it back in because the tissue’s all red as heck and it’s all swollen. It hurts like a SOB.
You finally grind it back enough so that they can tolerate having it in. Now over the next two days, what happens to the tissue? It shrinks back down and settles down. Now, how retentive do you suppose your denture is? Not at all. So, areas that you don’t want to screw around with too much are the post dam areas because it’ll cost soreness post-insertion. Then, when you try to adjust it, you’re going to overshoot the mark and the denture’s going to lose retention. Then, you’re like a dog chasing his tail or a snowball rolling down the hill trying to get this thing back to where it should have been in the first place.
So, don’t make your post dams way too wide A-P. Don’t make them grossly too deep. As wide as they make the post dams are half the diameter of the medium skinny acrylic bur. You know your tall one looks like a tall, skinny Christmas tree. Half the diameter of the tip of that bur is deep enough for the post dam. Maybe slightly more than half a diameter in these fleshy areas, but, for sure, not more than half the diameter of the midline and where it goes through the [42:25] areas.
So, if I stop anybody in the clinic in the next six months and say, “How come we do a post dam? What’s the function of a post dam for your palatal seal?” “To make the denture’s stay in.” Yeah, from what? So, what are the two things we’re compensating for? One is processing shrinkage of the denture. Remember when I talked about that when it shrinks to the middle, and if I’ve got a steep palatable vault, it may pull away from that in this area? Yeah? Processing shrinkage, don’t be a bit surprised if this shows up in the exam. Don’t be a bit surprised.
So, posterior palatal seal will help compensate for processing shrinkage, what else will it help compensate for? Movement of the posterior aspect of the tissue in the hard palate because of the flexion of soft palate. So, when the uvula and the soft palate flex up, it can compress or cause that tissue at the very back edge of the denture to move up just a little bit away from the processed surface of the denture and let air leak over the back.
So, it’s basically for soft tissue compression or movement where the back of the hard palate goes up and down or compresses a little bit because of the movement of the soft palate and dimensional change or processing shrinkage of the denture after processing. That’s why we do posterior palatal seals.
So, here’s one. If we poured a case out, we just grabbing that posterior palatal seal in. I’ll typically cut it in. Wow, I’ve really got you folks now. Talk about sleepy time. So, we’ll go ahead and cut it in with a bur and smooth it out with a number 7 wax spatula. It works really nicely. Here’s a different phases of we poured our index so we cut the back off. Here’s two different ones actually. They look the same.
Again, the color doesn’t match perfectly if I put the pink triad on, but it’s in area where it’s not seen. It makes a really, really nice contact with the tissue. It does a very nice job.
Class, prepare. We’re going to go over very quickly. What we’ve got here is we’ll ahead and take an impression. We’ll pour the impression out in medium or heavy body PVS. We get things poured up. We say, “Gee. In this area, we’re going to add a tooth, and we’re going to take this eyebar clasp and move the eyebar clasp from here up to here.”
So, we go on the inside of the partial and take a high speed round diamond, and we cut the eyebar clasp out of the way so it’s now free. I’m going to cut little tiny divots on the side of it to set things in. It’s going to go back on my model so what do I do? We add acrylic and we put the tooth in so the acrylic and tooth gets put in. The eyebar gets moved forward to the lateral incisor.
Can I always do that? No. What if they have some other clasp? They have these free made clasps that are either for the left side or the right side. So, I can go ahead, get a model, take one of those clasps and get some ortho pliers. Bend a little loop on these things. When I get the little loop bent on them, they can go ahead and be embedded in self-curing acrylic. So, we embed them in the self-curing acrylic, and we can add these little clasps on here. These are available at the desk.
So, here’s one where we’ve added clasps on the side. Here’s one where we’ve added a tooth and moved an eyebar. Again, this is our old friend the PVS model injected right into an alginate impression. Why? Because I don’t have to block out any undercuts, and I can take the partial off and on this model without breaking any teeth on the model.
A crown to fit your pre-existing partial, a tough thing to do. If we have a really good impression of the crown, we prep the crown, and we can go ahead, sometimes and just make a duplicate. This happens to be a DC pattern resin. Take an impression, a single impression of the tooth margin and wax our impressions on, cast the thing up. So, here’s our recast crown fitting the pre-existing partial. It only works if the crown is all gold, and it’s in good shape before we ever start.
Many times to do a tooth, a crown to fit a pre-existing partial, what the lab wants you to do is reseat the partial in the mouth is prepared and tissue packed, and when you take the impression of the tooth, go ahead and take an impression. Pick the partial in the tooth, and have everything up and send that to the lab. Disadvantage is what? The patient’s got to be without their partial during the entire time the crown is fabricated.
“Along with non-toxic dentistry, and helping fearful patients, the awareness and prevention of Gum Disease is a priority in our practice. We invite you to sign up for a free cleaning during our awareness week.” – Dr. Daniel Vinograd, DDS
To schedule your free cleaning in our San Diego office, call (619) 550-4904

For a Free Consultation with Dr. Vinograd, Call (619) 382-3884.
In this case, what we did was the tooth was extracted before the patient got to us, and we then went in, after the fact, wanted to add a tooth in this area, add a tooth in this area. So, what we did this time was just basically poured alginate into the underside of the partial so we could take a scalpel and carve this area in the back, add pink acrylic there, and just arbitrarily add the tooth and the pink acrylic.
Dab and dish a liquid and a powder in a paintbrush, trim an appropriate tooth so it’s the right height occlusal cervically, just arbitrarily build up and dollop up some pink acrylic there, keep putting just a little bit of monomer on the pink acrylic until it gets somewhat doughy. When it gets pizza dough like silly putty, you can literally take the tooth and squeeze it or set it right into the partially polymerized acrylic. Paint a little bit more monomer on it, and then you’ve converted this, added a tooth to it. What we did to it is realigned it with the temper soft liner.
Post dam modification. You’ve delivered a denture. The patient comes in and says, “Gee the denture doesn’t stay up very well,” or they’ve worn a denture a long time. They come back in and you look at the record. It was one that somebody made a year ago that’s now graduated so you inherit this case that’s a year or so old, and the student that made it had graduated. The patient says, “It doesn’t stay up very good for me.” So, if the denture doesn’t stay up very good for a maxillary denture, the most common reason is either inadequate extension of the denture on these corners by the two [25:16] or potentially and inadequate posterior palatal seal.
So, if one is going to consider repairing this area on the denture, the very first thing I want to do is take some fluid wax, the stuff that’s called Iowa wax. It doesn’t photograph that well. If you look closely, you’ll see that there is a skin of wax across the posterior aspect of the denture that’s shaped somewhat like a butterfly shape that we try to make for our posterior palatal seal. So, you can see over here it comes slightly through the notch. If I feel that the back corners are deficient, I might actually drag out the dreaded border molding compound and see if I could go ahead and develop these corners just a little bit
Now, the reason that I do that ahead of time is if the patient complains about retention of the upper denture, and I go in either with compound of wax, diagnostically, and rework this posterior area of the denture. Let’s say for the sake of argument that I do that and when I’m done, the retention doesn’t seem any better. I’ve really done it as good as I can, and it still falls right down. Anybody think of possible reasons why a patient’s maxillary denture might have really crummy retention?
The amount of saliva, either they have no saliva or the saliva they do have is extremely serous saliva, the stuff that’s really runny, the stuff that makes the best retention for dentures is the ropy saliva that slaps you on the rubber when you’re doing prophies. You take it out, and there’s this thing that’s about that long but it won’t break. It won’t snap. It just sort of whipping around there.
If someone’s got spit like that, then they’re probably going to do really, really good with an upper denture because that stuff is an interfacial surface tension provider. It stays in real good. If somebody’s got that really, really clear runny stuff that is just lighter fluid, those people are going to have a tougher time. So, they might either have really the wrong kind of saliva or no saliva or are really poor anatomical shape to the maxillary ridge, really flat. Some other people have had trouble whether they’re people with extremely round faces and really tight cheek muscles. It feels like no matter how they move their mouth, their lips at all, their mouth, their vestibule, their cheek muscles are so tight that it lifts off a lot from the denture.
So, people with these really round faces and high, tight cheeks, if this is the depth of the vestibule and that’s the denture flange going up in the depth of the vestibule and this is out toward the cheek, that area out toward their cheek, anytime they more their lips, is flexing up and letting air over the top. With some of situations, reworking my posterior palatal seal isn’t going to do anything for me. So, if I lay on the Iowa wax or do a little border molding or whatever and the retention doesn’t seem to improve significantly, stop. Don’t bother to go any further because you will turn this whole thing to plastic, your retention won’t be any better if it’s good as what you started with.
So, first, if you diagnostically try it on these things, see if the moderate retention improves significantly. The second thing you want to do is if somebody comes in, they complain about retention of the upper denture, the very first thing you do is a slap a PDS in and say we’ll just realign it and that will fix everything. So, you take a realign impression and you send it off to the lab. You get it back. You try it in, and it’s just as crummy as it was before.
So, again, if they come in with a poor retention of an upper denture, what’s one of the first things you can do to see if you’ve got relative intimacy of contact between the denture and the tissue? What’s something you can check with? PIP paste, and so what I would do is put a thin, thin filling of PIP paste on the upper denture, sit it really firmly, and if I have significant unevenness in the burn through pattern, it is okay to grind down the intaglio surface of the denture where you see tons of burn through.
Then, reapply the PIP paste and put it in, at the time you take the denture and you’re getting pretty uniform burn through pattern through the real thin layer of PIP paste you put in, surprisingly many times the retention goes up markedly, a lot. You didn’t send it off to the lab. You didn’t have to realign it. You just made sure the inner aspect of the denture had some semblance of being able to fit.
Now, if the denture’s 20 years old, you’re probably not going to bother doing that because I’m assuming the denture’s probably going to be poor fit, but if the denture’s not that old and they’re having problems, that’s what I’m going to check.
Let’s say for the sake of argument we figure out it’s the post dam. So, we go ahead and pour a plaster index on the inside of the denture. Once the plaster index has been poured, it captures the tissue surface, and you can see where we’ve put our Iowa wax in to give us a little more indentation for the posterior palate seal.
This is the part that freaks students: I go to the dam, and I cut the back denture off completely. They’re like, “What did you do? Oh my god.” So, you set the thing back down on your model. So, you’ve got your model. Now, remember your model did a very good job of capturing intimately the tissue surface of that denture looked like, and this is one of those areas.
Can you see that if I’m trying to paint this entire area across with a dab and dish of liquid, a dab and dish of powder and acrylic, when I’m painting in here, it looks fine, but when I’m trying to paint over the too glossy areas, it wants to go back in the middle? It’s a pain in the butt and takes forever. So, this is one of those things. This is the perfect indication for the use of that triad material. So, what you do here is on the posterior aspect where we cut it back, bevel this. I would bevel the plastic toward the oral side away from the tissue side. I’d put bonding liquid along there. There’s that bonding liquid back with the triad material. It comes in a brown bottle.
So, I’d put bonding liquid there and then cure that and then take a sheet of the pink triad material, cut a strip of it, and very carefully adapt it to this really well. You can do a very beautiful job of doing that, put the air barrier coating on it, put it in and cure it for 10 minutes. Then, you’ve got a new posterior border on your denture. Again, you wouldn’t even bother doing this if you didn’t see a marked improvement and retention when the patient came in complaining of retention and you tried to diagnostically put some fluid wax or something along the posterior aspect in the denture to see if that worked better. If it did, you go through this procedure, and it will give you a new back end on that denture that will give you significantly better retention.
This is one where we took basically a realign of a denture. So, this is the old days where we would do immediate [33:06]. I said, “Okay, but let’s do a realign of the denture. Then, on the inner aspect of the realign, we put the fluid wax.” This is a kind we used to use. It’s called proectowax. It’s what the Iowa wax replaces, and so, we’d have that set up. Here, again, we have the posterior palatal seal, but what is it that that thing’s supposed to do?
In any individual, when they go ahead and use the denture, you want the maxillary denture to stop at the junction of the hard and soft palates. So, the hard and soft palate junction, we want to have a little extra bead of the denture going up in the air. Reason being, when a person sneezes, swallows, yawns, does lots of different things, this area of the soft palate where the uvula hangs can flex up. It goes up in the air. If this area of the uvula goes up in the air, what it can allow is a little bit of air to come over to come over the top edge of the back of the denture, and that can cause the denture to break at suction. So, the working of the posterior palatal seal is to just give us a little extra beading of that area right there so that we maintain seal if the soft palate moves.
So, if you look at the posterior aspect of the denture cross-section, here’s the tuberosity. It goes up to the roof of the mouth. It comes down for the other tuberosity. Then, we go ahead and we build the denture that’s on this. So, we’ve got a denture that’s built here. Here’s teeth, and then here’s our denture flange that’s supposed to fit in this area intimately.
Now, what happens when we process a denture and the denture is removed from the stone cast, turned from wax into plastic, it’s all processed. In the lab, they break away the stone model. What happens to the dimensions of this acrylic looked at in cross-section is it tends to shrink towards the middle just a little bit. So, areas that are out here on the outer aspect would actually pull in tighter and rub tighter. People follow that okay?
The areas that are in here where you got the inner aspect of the hollow vault going up in this area if I blow up the denture, it would tend to pull away a little bit here and here. People follow that okay? So, you’ve got this curved shape of the denture. If it’s going to shrink a little bit to the center where it fits the roof of the mouth, if it shrinks in there it’s going to separate. Can you also see that the deeper a person’s vault is, the more pronounced the pull away is? If a person’s maxilla was as flat as a pool table that it was just straight across, their thing shrunk to the middle. Can you see that would cause no vertical separation? If I had a really V-shaped ridge that almost looks like a submucous cleft so that there’s this incredibly deep vault going there, near vertical, when things shrink to the middle, now I’ve got more problems there. People follow that okay?